


Fred's Appliance Academy
June 30, 2023
Refrigerator Training
Though many people say it can't be done. In this video, we're gonna show you how to solder steel to copper.
First, we're gonna begin by cleaning both the steel and the copper. This process doesn't need to be done in any particular order. I just grabbed the steel first. I'm going to fast-forward the two sections of sanding in this video, but that doesn't mean they're not important. When it comes to sanding, clean is king, if you find a portion of the metal that appears not to be sanded enough, it's always safe to assume that is not and go back and re-sand it. Here in this section, I'm using 120-grit sandpaper, which is probably the most common type of sandpaper to use. You don't wanna be using such fine sandpaper that you find it's actually difficult to sand the material clean. With the copper, you can see a very distinct difference between the sanded and non-sanded areas. With the steel back in the vice, we're gonna begin the pre-tinning process. And for heat, we're simply using camping gas. This could be picked up at Walmart, Kmart, or any camping store for usually around 25 to $30 for the gas and the torch head. Here you're gonna see me take the torch to the tinning flux. We're just using Oatey No. 95. You get it, home Depot or Lowe's - usually for under $10 for this size container. And the whole purpose is just to soften it so it works in the brush a little bit easier.
Pre-tinning means that we're going to add a very thin layer of solder to the steel tinning. Flux has powdered solder in it, so when we apply heat and then we apply the flux, the solder comes out of the tin solution and adheres to the steel. This process can be done to multiple different types of metal. However, in refrigeration, we're typically dealing with steel, copper, and sometimes aluminum. And just a side note, if you are dealing with aluminum, aluminum requires an aluminum flux. You should note that I'm adding heat first and then applying the tinning flux, which is the appropriate way to use a tinning flux. When the tending process is complete, you should see a nice chrome finish to the material and any excessive flux should be wiped off. Next, so we can get the steel inside of the copper tubing, which is going to be 1/4" copper tubing.
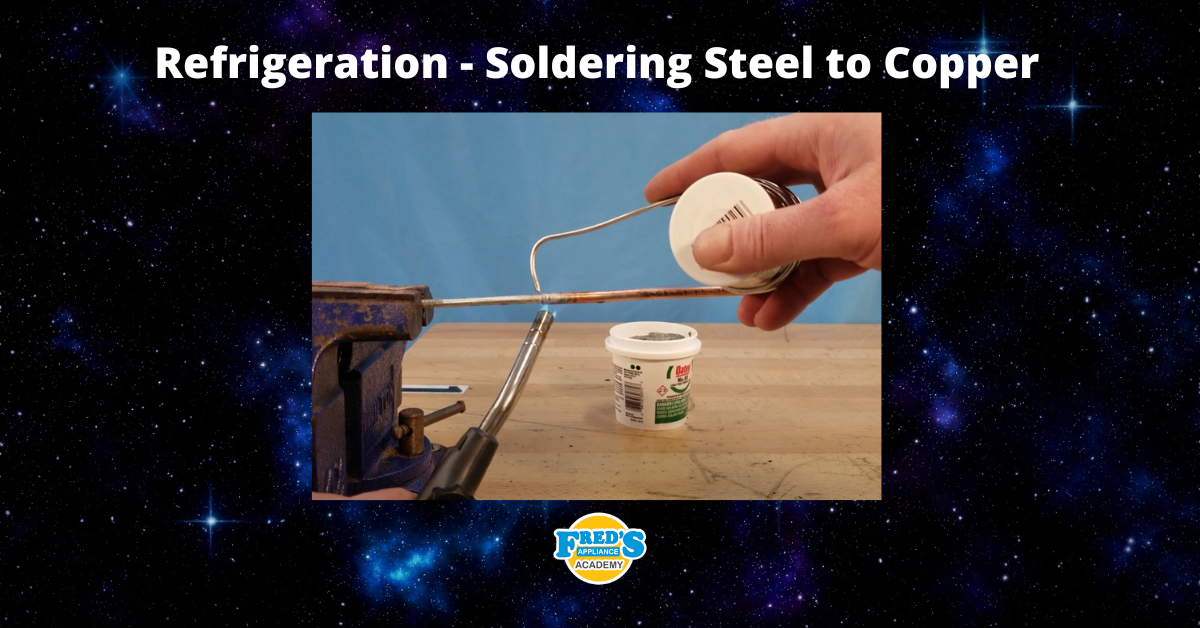
We're gonna be using this T 10 torque bit. This process can be a little bit difficult, but by pushing into the copper and twisting at the same time, you will slightly expand the copper, allowing it to fit over the three sixteens inch steel line. Also, the little tap on the copper you saw there was me knocking out any debris that may have been pushed inside the tubing. So here I'm sliding the copper over the steel and I'm roughly inserting the steel inside the copper about 3/4". Now that we have the copper and steel together, we're gonna go ahead and tin the area in which we'll be making our joint. Once again, we will apply heat and then apply the inning flux. A little pro tip for you, the flame should never touch your brush. If the flame touches the brush, it will melt.
The bristles and oil can be released causing a contamination in your joint and the solder not to bond. Another tip is to use the torch appropriately. Excessive flame causes excessive heating and will build up a layer of oxide, usually indicated by a black film on the steel and or copper. If this film develops, the solder cannot bond to the material, it must be res, sanded, and then go back through the tinning process. Once the materials are up to temperature, only a tiny dab of solder is needed to set the joint. One of the biggest mistakes we can make as technicians is using an excessive amount of solder, which will flow inside the lines and cause a restriction. It's a little bit difficult for the camera to pick up on, but here you can see the solder has made it all the way around the joint.
PS, if you're wondering, it's Oatey silver-bearing solder that we're using in this video. Any silver-bearing solder should do as long as it falls between 3% to 6% silver. To prove to you how strong this joint actually is, I'm going to try and break it. So I've gotten out my Robinair pipe benders, and I'm gonna make some handles to twist if you've never used these before, the flat side goes to the left, the round side goes to the right and the tubing is inserted into the appropriate slot. I first bent the steel, which was 3/16, and now I'm doing the copper, which we can see being inserted into the 1/4" slot. There's also a number on the outside of the pipe bender indicating what angle you are bending. And as you can see here, I've done two 90-degree bends.
So without further ado, here's me trying to break the joint that I just set. My first attempt to break this joint is me gonna be rotating the handles at 180 degrees as we can see there. Next, I'm gonna rotate an additional 180 degrees for a full 360, and you can see the joint has still not broken. A little bit of fast-forwarding as I try to break this joint by twisting it over and over again. And there we have it. The steel has failed, the joint has held, the copper has held, but the steel itself has failed indicating that that solder joint is stronger than the steel itself. So when it comes to residential refrigeration, when soldering steel to copper if done properly, is perfectly acceptable.
Join the industry's best trainers.

(800) 781-1814Text or ring! ring!
Live ChatClick to say hi

Apr. 29, 2024
Appliance Industry 2024 Q1 Results

Apr. 29, 2024
Congrats to our graduating April 2024 class

Apr. 05, 2024
How to test a gas range ignitor

Mar. 29, 2024
Congrats to our graduating March 2024 class

Mar. 22, 2024
How to test a 120 volt receptacle

Mar. 01, 2024
Congrats to our graduating February 2024 class

Feb. 05, 2024
Why Is Your Dishwasher Soap Not Dissolving? (5 Easy Fixes)

Feb. 05, 2024
Refrigerator Dripping Water Inside? 5 Quick Fixes

Feb. 02, 2024
Appliance Industry 2023 Q4 Results

Feb. 02, 2024