


Fred's Appliance Academy
August 18, 2023
Dryer Training
How to remove a seized blower wheel with motor replacement.
Well, I hate to say it, but first, we got to begin by tearing it down and getting to the blower wheel. Begin by removing the lint screen and the two screws that are located below it. Most commonly, these screws are a number two Phillips. Next, we're going to go ahead and pop the top, and I can do this by pulling forward and gently lifting, but if necessary, a putty knife will do the trick. Also, be sure to disconnect the door switch that's located right underneath the front right corner.
With the top securely propped up, we need to go ahead and remove the 2-5 [inaudible 00:00:46] screws that are securing the front of the dryer to the cabinet. A nut driver typically works best for this, as it can be hard to get power tools in small areas. Once you have both the left and right screws removed, pull the front panel forward and lift it up and off of the cabinet. Next, go ahead and remove the belt and pulley as you see here.
With the belt and pulley now released, simply lift the drum with the belt and set it aside. Now that we have the unit turned around, we're going to go ahead and remove the terminal block cover as well as the rear panel. And you can see I'm using power tools and all I'm going to say is if you want to use power tools, be careful and don't strip things out. Next, I'm removing the four screws that are securing the blower housing, and I'll simply pull on the bottom, lift slightly up and pull it away from the back of the unit. It does help to tilt the appliance forward slightly so it doesn't fight you on its way out.
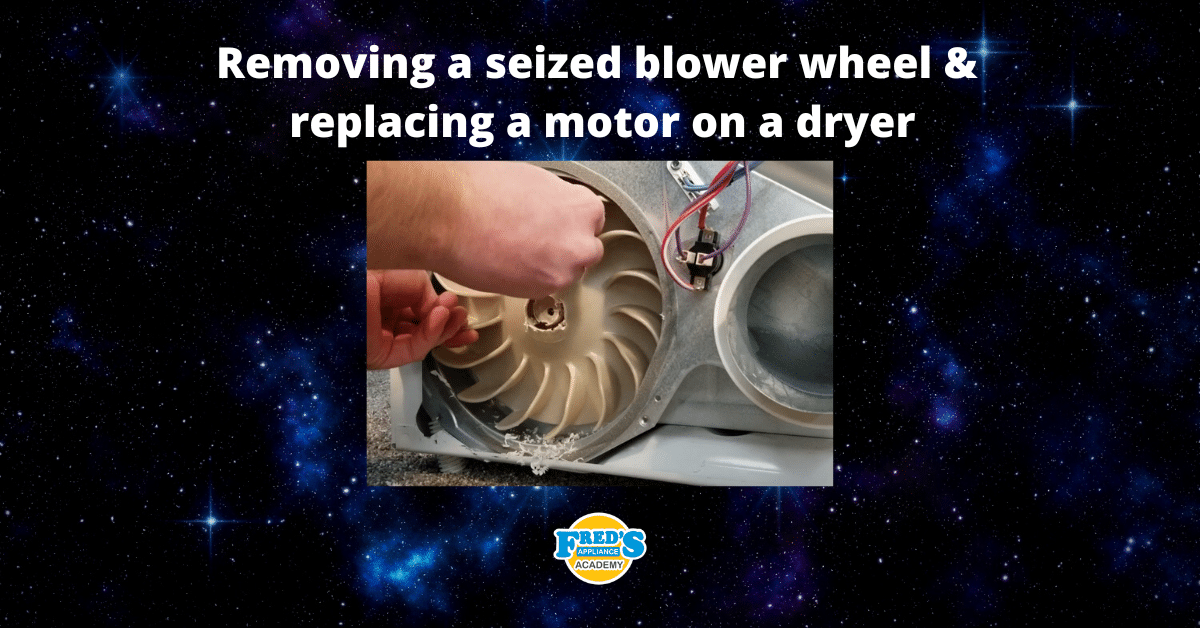
Now that we have the blower wheel exposed, I'm going to show you four techniques we would use to remove it when it seized to the motor. As you can see, I've locked the blower wheel using a handle to a hammer, and the first technique we're going to do is simply to chisel the blower out. To do this process, you would chisel around the center of the blower wheel until it is completely broken free from the drive shaft of the motor. I typically don't recommend this technique as it can be quite tedious and loud with all the hammering and chiseling. Next, we're going to use a drill, assuming that it's the only tool you have for removal. Right off the bat, you can see that the blower wheel wants to turn with the drill, and this is my fault because I did not have my foot securely on the handle to the hammer, allowing the blower wheel to turn.
Having secured the handle back in place and firmly placing my foot on top of it, I will continue to drill small holes just outside the center of the blower wheel. To complete this process, you would drill small holes all the way around the center of the blower and then bring the holes together using the bit, making one universal hole and allowing you to slide the blower out for removal. Although this process is nowhere as noisy as chiseling the blower out, it is a bit time-consuming and takes a bit of practice to work the bit, especially when you're trying to bring the holes together to make one uniform hole. I typically would not recommend this technique unless it's the only option you have for removing the blower wheel.
The next technique combines drilling and chiseling together. Once you have holes drilled all the way around the center of the blower, simply use the chisel to chisel between them and bring them together. Although we are chiseling and it is quite loud, this technique is effective and quick at removing the blower wheel.
Lastly, for the quickest and most efficient way of removing the blower wheel, we'll be using a hole saw. And here you can see, I've left the pilot drill bit inside the hole saw, and this is a mistake, and I will show you why. Using our one and one-quarter inch hole saw, I'll begin drilling in the center of the blower wheel and you'll see I will not be able to go down into the center of the blower. This is because there's a metal bushing in there and it's impeding my drill bit from going in. To remedy this issue, we're going to be removing the pilot bit from our hole say, and not all hole saws have this option, but I highly suggest that you buy one with it.
With the pilot removed, I'm firmly pressing down on the hammer holding the blower wheel, and I'm going to drill out the center of the blower wheel. I will caution you, the more aggressive your teeth are on your whole saw, the more it's going to want to grab the blower and spin it. During this process, you may have to drive the hole saw in and out a few times as it does like to grab onto the blower, but the end result is, is that this is a much superior and faster way at removing a seized blower.
Also, when using power tools, please keep in mind that everything around you is razor sharp and one false move can land you in the doctor's office to get some stitches. Here, you'll see I get through the blower wheel and my hole saw does stick to it a little bit, and that's normal. Just a little bit of tugging on it is enough to break it free. Once the hole saw's been dislodged, the blower itself is free for removal.
Here, we're going to use a 5/16" nut driver to remove the rear mounting clip to the motor. The reason I do this is that it's a little less prone to slipping off than a flathead screwdriver would be. As far as removing the front clip, simply push it down and roll it off to the left and it'll come right off. Once you have the clips off, be sure to disconnect any electrical connections. This could be done before you take the clips off, but it's just a little bit easier to roll the motor over as you saw and pull the quick connect right off.
With everything disconnected, pull the motor back and up to remove it. With the new motor in hand, install it in the same position as the original. Also, be sure to reconnect all electrical and retaining brackets before operating the machine. Lastly, align the blower to the motor's drive shaft and spin it to the left as it is reverse threaded. There's no need to apply additional torque on the blower as it will tighten itself in normal operation, and please follow these instructions in reverse for reassembly.
Join the industry's best trainers.

(800) 781-1814Text or ring! ring!
Live ChatClick to say hi

Apr. 29, 2024
Appliance Industry 2024 Q1 Results

Apr. 29, 2024
Congrats to our graduating April 2024 class

Apr. 05, 2024
How to test a gas range ignitor

Mar. 29, 2024
Congrats to our graduating March 2024 class

Mar. 22, 2024
How to test a 120 volt receptacle

Mar. 01, 2024
Congrats to our graduating February 2024 class

Feb. 05, 2024
Why Is Your Dishwasher Soap Not Dissolving? (5 Easy Fixes)

Feb. 05, 2024
Refrigerator Dripping Water Inside? 5 Quick Fixes

Feb. 02, 2024
Appliance Industry 2023 Q4 Results

Feb. 02, 2024