


Fred's Appliance Academy
June 9, 2023
Dryer Training
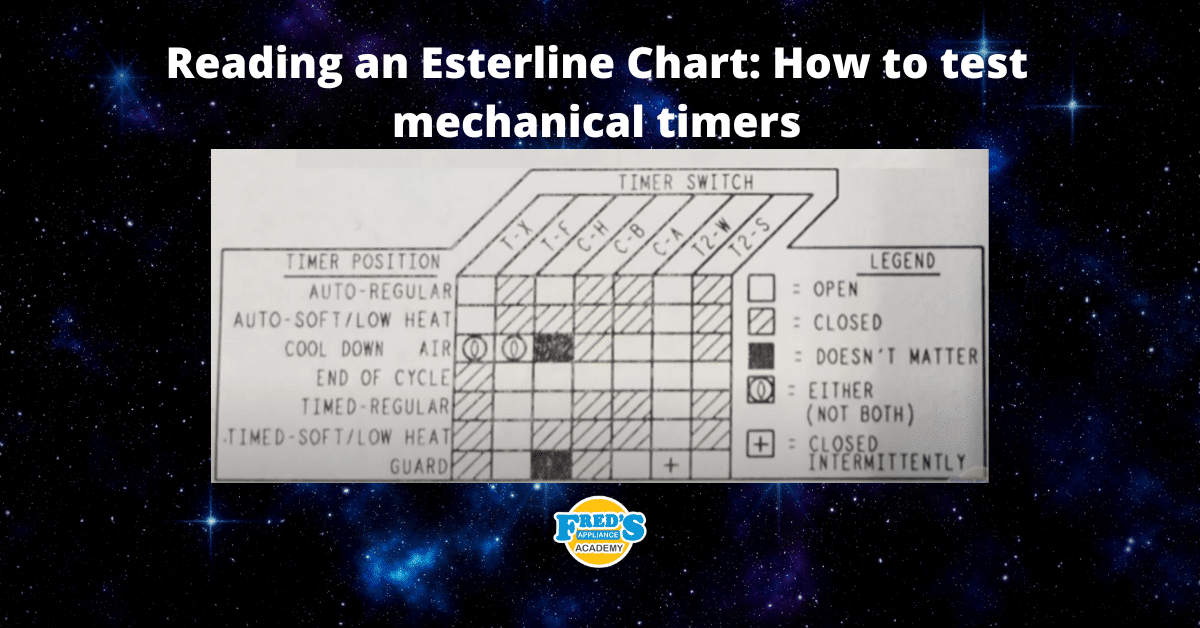
Using and understanding the Esterline chart. So here we have our Esterline chart also referred to as our timer sequencing chart. So in this video, what I'm going to do is explain to you how to read the chart, explain to you when you as a technician would actually use this chart, and also explain when you would be done testing. So to begin, let's start off with the left-hand side of our chart and that takes us to our timer position. And all this means is that these are the available cycles on this particular dryer. So our timer position can be set to auto regular, auto soft, cool down, end of cycle, timed, timed soft, and guard (guard will also be called wrinkle guard). At the top of the chart, we have our timer switches, and over to the left here we have T and X. T and X represent actual contacts on the back of the timer.
So where all of your wiring goes to the timer, if you were to take all of the wiring off, you would just be left with contacts. So for example, T right here would represent a contact and X would represent another contact, and those two contacts together would make a switch. Over to the right we have our legend, and this is simply telling you what position the switches are going to be in. So right here we have an open box. That means that's an open switch. Below it we have hash marks, meaning that it is closed. A solid box means that it does not matter. A little circle means that it's either but not both. And the plus mark means that it's closed intermittently. So let's come back over to our timer position right here. And the standard test for most dryers is going to be our timed dry right here or timed regular.
So we're going to take timed regular and we're going to come to a little box that we see here first. And here we have hash marks. So if we go all the way up, what this means is if I put a meter lead on contact T and one meter lead on contact S with this dryer set to the timed dry position, that switch T and X should be in the closed position. Next over we have an open box. So if we went to T and F with our meter leads, that switch should be open. Next, we have C and H, that switch should also be open. Next, we have hash marks again, indicating that C and B would be closed, hash marks again indicating that C and A would be closed and an open box indicating that T2 and W would be open. And lastly, we have T2 and S, which should be in the closed position.
Coming to our timer position, again, we're going to go down to the cool down and air cycle. Here we have the unique circle icon, which almost looks like an eyeball indicating that that switch is either but not both. And I'm going to explain what that means. So we'll start here on the first one and we see that it is going to be contact T and X. What this means is if contacts T and X are in the closed position, then contact T and F over to the right must be in the open position. If we were to come over to the second box again with our circle right here and we were to put our meter leads on T and F and T and F were in the closed position, that would mean that T and X must be in the open position. T and X and T and F will always be in the opposite position of one another.
And that's what either but not both means. Next, our third box here is a solid box, meaning that it does not matter. And in fact, if we were to put our contacts on C and H, it does not matter what position that switches in. It can be in the open position, it can be in a closed position, and that cycle will operate normally. One more time in our timer position here, and we're going to come down to our guard or our wrinkle guard. And here we have our little plus mark right here. What that means is that the switch will be opening and closing intermittently. How wrinkle guard works is that the dryer will turn itself off periodically and then periodically turn itself back on tumbling for just a few seconds and then stopping again, this prevents the clothes from sitting in the drum compacting on top of each other and causing wrinkles.
So when will we use the Esterline chart to our advantage or when will we use it out in the field to resolve an issue? Well, again, let's come to our timer position, and let's say the customer is complaining that in time dry the dryer works, it heats, and it doesn't have any problems, but when they use it in the auto regular cycle, it will not heat or maybe it takes too long to dry, whatever it is, they're having an issue in auto regular. If I were to go into the dryer and test all the internal components like my thermostats, my heating element, and all that stuff, and I don't find an issue inside that dryer, now I'm going to need to come back to my actual physical timer and make sure that these switches, let's say the first box here on auto regular, T and X, are in fact in the open position when I have it set to auto regular.
If I came over to my second set of contacts and I found that T and F, which are supposed to be in the closed position, are actually in the open position, I have confirmed that the issue is in fact inside the timer and that replacing the timer will resolve the customer's issues. So our last step is to know when we are done testing. So again, for instance, we're over in our timer positions and the only cycle the customer is having an issue with would be the timed dry. That would be the only cycle I would need to test. So I would run through my set of switches or all my switch contacts and try to find the issue and verify that it is in fact and the timer. Once I'm done with that if all the other cycles are working fine, auto regular is not an issue, auto soft, cool down, end of cycles working, time soft, and guard all work, there's no reason to test those switch contacts.
So let's say the customer complains that auto regular is not heating and timed regular is not heating. All I would do is go through timed regular and all the switch contacts. I would go through auto-regular and there would be no reason to go through the remaining cycles because there's a non-issue in that particular setting. Maybe an easier way to think about it, again, would go into our timer positions and set the dryer to every single one of these settings and see if it works. And we can confirm, let's say auto regular works, auto soft does, the cooldown works, end of cycle works, timed regular works, and timed soft does not. We don't have heat there. And wrinkle guard works. Again, the only setting we would need to test through would be the contacts for our time soft. We'd run through and try to find or isolate the issue in the timer here. Hope you understood and enjoyed the video and if you have any questions, please feel free to leave them in the comment section.
Join the industry's best trainers.

(800) 781-1814Text or ring! ring!
Live ChatClick to say hi

Apr. 29, 2024
Appliance Industry 2024 Q1 Results

Apr. 29, 2024
Congrats to our graduating April 2024 class

Apr. 05, 2024
How to test a gas range ignitor

Mar. 29, 2024
Congrats to our graduating March 2024 class

Mar. 22, 2024
How to test a 120 volt receptacle

Mar. 01, 2024
Congrats to our graduating February 2024 class

Feb. 05, 2024
Why Is Your Dishwasher Soap Not Dissolving? (5 Easy Fixes)

Feb. 05, 2024
Refrigerator Dripping Water Inside? 5 Quick Fixes

Feb. 02, 2024
Appliance Industry 2023 Q4 Results

Feb. 02, 2024