


Fred's Appliance Academy
January 6, 2020
Dryer Training
Hey guys, Tim with Fred’s Appliance Academy here with another great video for you. In today’s video, we’re going to be working on this Frigidaire electric dryer doing the rear drum bearing on the dryer itself. For a lot of you, this has been nothing but trouble. It’s impossible to try to wrap your arms all the way in and around to try to get the ball bearing secured to the back of the drum. I found a couple of easy ways, a couple of tricks for you that I want to show you here in this video to be able to do this job at a little bit of a faster pace and make things a lot easier for you on the road.
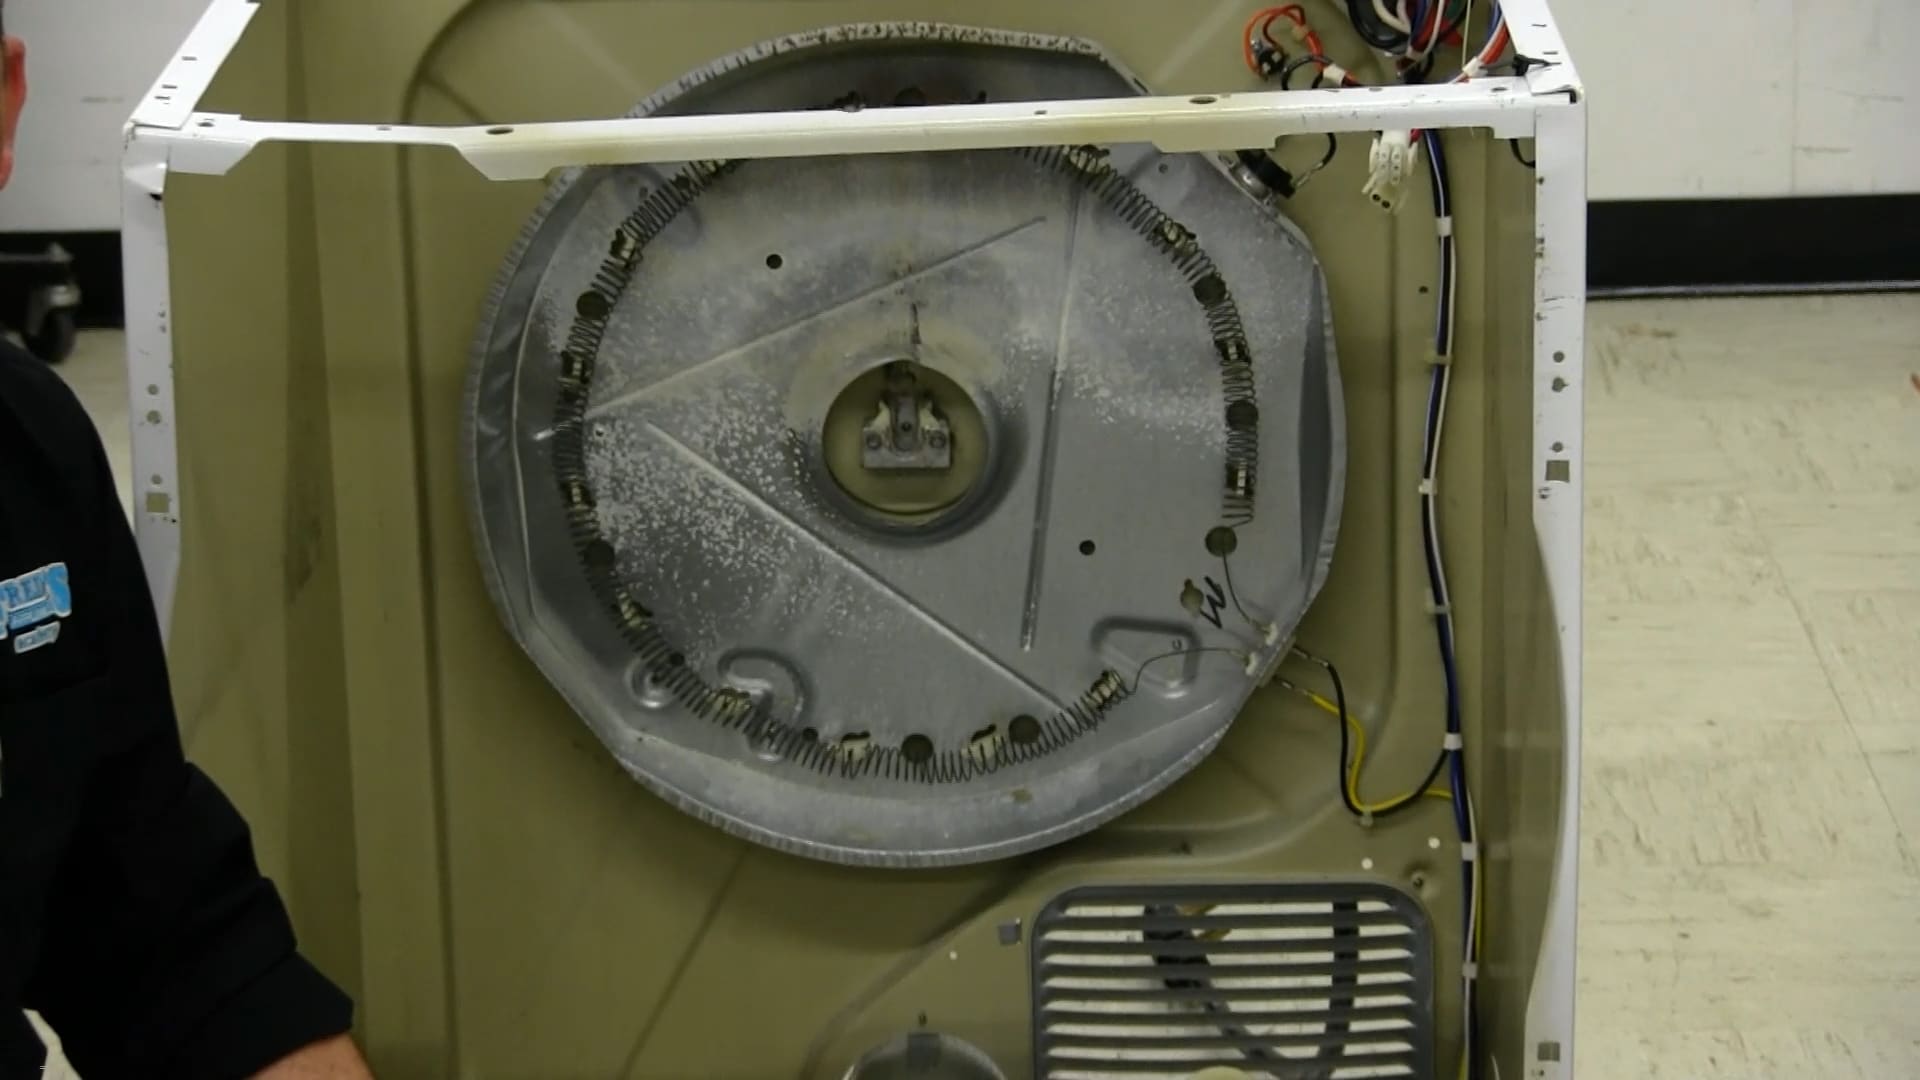
So inside here, you can’t really see the inside of the dryer, but there are three screws that hold that ball bearing on the back of the drum. So we’re going to have to remove the drum from the unit. And once we get that out, we’re going to go ahead and remove those three screws and remove the old bearing. Likely you’re replacing this because the customer has said, “Hey, my dryer is making a really awful scraping noise. The drum feels really loose inside,” things like that nature. And you’re going to open it up. You’re going to find out that the ball bearing has actually worn through the plastic carriage and it’s now scraping along with the metal bracket that it sits on. So we’re going to go ahead and get this unit apart here and we’re going to get this drum out and get you a good view of what we’re going to be doing here. So we’ll be back here once we get this done.
All right, welcome back. I’ve got the drum out. I have our old bearing out. Things to know when you open up your new bearing kit. You want to make sure you’re checking all your parts, make sure that you have the correct screws. Everything should be brand new, the bearing itself, the screws that go with the bearing. And with that said, the bearing plate; when it used to come, it was never pre-threaded. I noticed on our new bearing plate there, it actually came pre-threaded. So what I used to do in the field was I would take the new screws and I would tread each hole first before trying to attempt to put this in. If you didn’t, it was just a problem. So the newer style here, I noticed, it comes with a washer and then three fine threaded Pan Head Phillips screws. The older style was a number two square bit, which is a Robertson style screw. Frigidaire used to love to use those and they still do to this date. So get yourself a square bit driver. And again, it’s a number two. You can get it from any big box store, you can get it from Amazon, but this is going to come in handy a lot of the times.
So you want to make sure you’re replacing everything new. All right? So I have my new bearing in there, and this is probably the hardest part and where a lot of guys will struggle and fight. Sometimes a customer will go, “Hey, do you need me to help you out there? Do you want me to give you a hand?” I try not have the customer help me. I don’t want them getting hurt. I don’t want them accidentally getting shocked with the electrical if for some reason I’m testing something. I just want them out of the way. I want it for their safety. And also for yours as well.
So what I can do here is … What you want to do is you want to place your bearing to where you’re going to be able to line up one of the holes. Now, I’ve got two of these. It’s a magnet from a magnetron. You replace the magnetrons left and right in the field so you can carefully pull one apart in a well-ventilated area, careful, it is sharp and use these. These come in handy, even for your tool bag. So instead of going out and buying the real expensive magnetic tools, you can use a magnetron magnet to magnetize all your tools. In this case, I’m going to use it to keep my bearing in place. So I’m going to line up my first bearing hole and I’m going to place a magnet there. Then I’m going to take my other magnet to the other side here and I’m going to line it up on that side. I’m going to give it one more look here to make sure that we are lined up so when I go to the other side, I’m going to be able to get this screw started. And in that position there, I look pretty good.
So now what we’re going to need to do is we’re going to need to take the screws and put them on the other side. And what we’re wanting to accomplish here is just to snug this one down, keep it in position so we can move it around once we get that into the on position. So I’m going to go around to the back here and get this screw going.
Now you may have to reposition the bearing and the magnets if they don’t line up correctly. So still, it is a tedious job. Never said this was going to be a quick fix. We know in this field nothing’s ever quick. But I’m going to go ahead. I got that lined up pretty good in the first shot there. That never happens, by the way, so don’t go bragging to your friends that you’re able to do it the first time because you’ll never be able to do that again. All right, got that one nice and snug down. I’m going to remove my magnets. But you see I’m using a lot of floor covering here. I don’t want to damage the customer’s floor, so I’m placing everything on this blanket here. You can get a bunch of moving blankets from Amazon for a very cheap cost. Floor protection’s always the biggest thing out there that you want to make sure that you’re looking for and you’re taking care of is the floor. So I’m going to look, make sure I’m lined up there. It appears to be. And I’m going to go ahead, snug these down. And we’re using all the parts that came with it. So the three screws and three washers will go onto this plate here.
And if you’re off just a little, once you get that second one going, it’ll shift that last one into place. Just make sure you’re not cross-threading this. So that’s the reason why I’m using a hand screwdriver here not a screw gun because it’s very easy to strip out screws when using a screw gun. Good. Tighten all three down. And the hard part’s over. So I’ve got the new bearing intact. It’s in place here. So what we still have to do is we have the inside to still do, the dryer there. We have the actual carriage or hitch that the ball’s going to go into, which is plastic. We have the bracket for that, the ball bearing, and the outer bracket that we still have to put in.
So what I’m going to do is start cleaning up my mess here. I’m going to get those parts out, get that ready to go, get you inside this dryer and show you exactly what we’re looking at inside there. There’s going to be one extremely important part that you cannot, and I repeat, you cannot forget to put in there and we’ll go over why. So go ahead, get this cleaned up here and out of the way and we’ll get into the dryer here.
All right, we’ve got everything put together on the drum side. So now what we need to do is everything on the inside here, which includes our metal bracket, our ball hitch, and there’s a ball bearing right in the middle of that ball hitch there, and I’m going to get you in close enough so you can see here. So right in the middle, we have this little silver-bearing. It’s a round ball. I ask every class, what’s it for? People say, “Make sure the drum runs smoothly.” Some say, “Keep tension on the drum so it doesn’t move forward or backward.” You know, those are all great answers and everything. And what it’s in reality for, it’s the most important part of this unit when putting this unit together, it’s actually a ground. It’s a ground for the drum that if for some reason the drum were to ground out against our heating element or if our heating element should break and ground out to the drum, it’s not going to energize the drum. We’re not going to be able to keep the 240 volts on the drum there. So it’s actually a safety. We need to make sure that goes back in no matter what.
So we’re going to go ahead and we’re going to remove all this stuff here and we’re going to put in new. And again, with every part that you get, always replace everything with new. So I’m going to go ahead and grab my five-sixteenths nut driver and it’s just two-five-sixteenths screws right here for the front bracket. Take that, put it on my tool mat, there. I’m going to go ahead, pull that out. Now, that ball bearing, it’s either going to come with the plastic assembly here or it’s going to come with the rear bracket. Just as long as that is there, it doesn’t fall inside the dryer and then makes noises later down on the road.
What I like to do is when we put this together, and again we have all brand new parts here and we’re going to be using this metal bracket and this hitch here. Now, these get greased. And what’s very easy for this is if we add a little grease to the back of the plastic hitch here so the ball bearing stays in place while we try to put everything together. So I’m going to use the supplied high temp lubricant grease that Frigidaire gives you in their kit. I’m going to add just a little there on the back. I’m going to place my new ball bearing right inside that hole right there. And then what I’m going to do is I’m going to go ahead and I’m going to place my hitch and the bracket right through there. I’m going to take my two new provided screws. We’re going to put those back in there. Again, replacing everything is a big deal.
All right, well we have those there. I’m going to go ahead and take my rear bracket that we’re going to thread into and that’s going to hold the bearing into place on the backside. My five-sixteenths nut driver. Screw these down evenly. You want to make sure they’re nice and tight. This is what’s going to hold up the bearing and the drum. But again, not over tightening to where you can snap the plastic hitch or where you’re going to strip out the screws. Okay. Now that that’s on, going to inspect everything, make sure everything looks good inside there. And then what is required, Frigidaire says take this lubricant and put about a nickel amount inside. What I’d like to do is if I come out to a Frigidaire dryer with this bearing style there and I don’t see that the actual bearing has enough grease inside of it, I’m going to go ahead and re-grease it. So what I’m going to do now is I’m going to grab my belt and my drum here and we’re going to place that back inside and get that back into position here.
Always inspect the belt looking for any tears, any fraying on it, any cracks on the inner side of it to make sure that you don’t need to replace the belt as well. Usually, again, the reason why these bearings fail is because of heat. Either the venting is blocked or they have a lot of lint inside the dryer itself and it’s causing excessive heat inside. So when that happens, the grease actually thins out and it won’t allow that bearing to stay lubricated. Now I kind of use the belt as a guide and it’s going to help me when I go to put this in here. I can lift right up on this. And you’re just looking, and I’m on, just looking to get right on that hitch.
Now the belt can be done one of two ways. The first way is you can go through the front. Or on some of the Frigidaire units, they actually had a little door in the back there where you can go ahead and do the belt from the backside. I still like to do it the old fashioned way. And when you’re in here, you also want to make sure, before you put the drum back in and put the belt on, you want to make sure that you oil up with Zoom-Spout or 3-In-One turbine oil the idler pulley itself so that doesn’t squeal. We know that’s on there now. So let that sit there.
Now in front of the Frigidaires, many people don’t know, but this actually has a guard for the front here that comes with all new Frigidaires. And what that does is that actually sits right in the front and it helps preventing that drum to come forward on us. So that way there, if the belt was snapped off or the bearing was snapped off, it wouldn’t come forward and then it cause a short against our element. So we’re going to go ahead and put that in there. Now that drum doesn’t ride on that, what it rides on is a front bulkhead, which I have over here.
I’m going to go ahead, make sure that connect that there. And that slides down on there. Now the wiring, do not cut the zip tie that’s in here. The zip tie’s there, that comes from the factory to hold these wires up so they don’t end up hearing scraping sounds while their unit’s running. If the zip tie breaks off, replace it. These wires cannot hang. You’ll end up doing more damage by not putting those back in there. So what I’m going to do is I’m going to lift up on a drum just a little to get it on the front glide. That snaps back together. I’m going to go ahead and screw down my control panel. What I like to do is I always like to keep the screws for the parts, like for the control panel here or the front assembly, like to keep those all together so I know those are the screws that go there so I’m not trying to guess later on down the road. I know I said that in other videos, but it’s just something that helps you out to be kind of organized in the field. Make sure all the wires are tucked away. And the top. The top slides in right up on the top here. And then there’ll be two screws that hold the top in.
Now, with the old parts, you could do one of two things. I like to show the customer the job that I did with the old parts and I like to show them just exactly what I replaced. So we can take those old parts that we have laying on the ground there and then we can box them all backup. And what I like to do is I like to tell them that they’re all set. I’ll go over the parts with them that were replaced and show them exactly what happened and what they should be doing and what causes it. If it’s a ventilation issue, I’m going to also go ahead and notate that in my service order and recommend that they have a dryer vent cleaning company come out. So that way they can’t come back and say, “Well, you never told us this or I didn’t know that I was supposed to do that.” They should have it done once a year. It’s very important with the venting. You can check out our video that’s on our YouTube page about the dryer venting and which one is the best versus which one can ignite the quickest and burn the most.
So that’s it. That’s your Frigidaire rear bearing. Kind of an easier way to do it with the two magnets, I am sure that you guys have other ways of doing things. Again, I don’t like to involve the customer if I don’t have to. It’s about taking your time, becoming innovated when it comes to this position and thinking up ideas that you can use to get that, some of those hard to reach or hard to do jobs, get those done on your own. So if you like the video, like, subscribe to our page. For any questions or anything that you have, please leave comments. We’ll get back to you on that. And we’ll see you again when we start getting some more videos out there and when we come up with something else to do. Until then, Tim with Fred’s Appliance Academy where we’re training tomorrow’s technicians today.
Join the industry's best trainers.

(800) 781-1814Text or ring! ring!
Live ChatClick to say hi

Apr. 05, 2024
How to test a gas range ignitor

Mar. 29, 2024
Congrats to our graduating March 2024 class

Mar. 22, 2024
How to test a 120 volt receptacle

Mar. 01, 2024
Congrats to our graduating February 2024 class

Feb. 05, 2024
Why Is Your Dishwasher Soap Not Dissolving? (5 Easy Fixes)

Feb. 05, 2024
Refrigerator Dripping Water Inside? 5 Quick Fixes

Feb. 02, 2024
Appliance Industry 2023 Q4 Results

Feb. 02, 2024
Congrats to our graduating January 2024 class

Jan. 26, 2024
Clever ways to use airbags to level your appliances
Jan. 12, 2024