


Fred's Appliance Academy
January 28, 2020
Video
Hey, what’s going on everyone? Tim with Fred’s appliance Academy. We’re here with another video for you. Today’s video, we’re going to focus on a top load direct drive washer, which is produced by Whirlpool. You’ll also find it under the Sears Kenmore brand as well as the Maytag brand. What we’re going to do is I’m going to show you the simple steps of replacing your motor coupling. This would generate a service call for, the unit does not spin or the unit does not agitate. The customer may have a weird grinding sound underneath the unit and that’s what we have is a broken coupling, so we’re going to focus on how to get this case off and we’ll get it off there, we’ll show you where the company’s is located at and what you’ll want to replace.
When we look at the washer here, what we want to do is we want to look to see behind it if we have any areas or screws, which will be Phillips screws there, and if there are not screws there, make sure the side does not pop up. You’ll also need a putty knife possibly. Right up underneath, you’ll come up underneath here with a putty knife and this is how this one works and this’ll pop up from there. You’ll do the same to the other side. We’re going to go ahead and get this case off here and we’re going to expose everything on the front there so you can see, get a nice view of what we’re going to be doing and the easiest ways of doing things so we’ll be right back.
All right, welcome back. We’ve now got the case off everything exposed here and as a precaution with any job, what we’re going to do is make sure that the water is turned off and the power is disconnected for safety. Where we’re going to be focusing on is down here at the pump assembly, which is connected to our motor. Behind the motor is our actual coupling that couples the motor and the transmission together. So in order to do this job, we’re going to have to remove the pump from the motor. By doing so we’re going to be using, you don’t need a screwdriver, but if you have trouble getting this off here, you can use one, but make sure you’re using gloves so you don’t end up stabbing yourself in the hand. But if you just take your finger and you just pull up on this bracket and twist, this bracket it comes right off. There’s a T’d area here where this goes into a slot inside the motor and then you’ll just twist and place down. So again, that’s why it’s really important to disconnect the power before we do this.
Same thing for the bottom. We’re going to go ahead and pull this one off and we’re going to twist that out of the way and put that right off to the side. We’re now going to disconnect the pump from the motor and we’re going to set it off right to this side, so now everything is ready to go in our motor area here. On the motor brackets, we actually have two quarter inch screws here. So we’re going to need a quarter inch nut driver, but the first thing that we’re going to want to do is go ahead and disconnect our wiring harness and lay that off to the side. We’re going to get our quarter inch nut driver so we can go ahead and pull these screws out. These screws must go back in, this is what’s actually holding that bracket together at the motor there so it does not come out and cause any other issues that we don’t need. So put your screws right off to the side there.
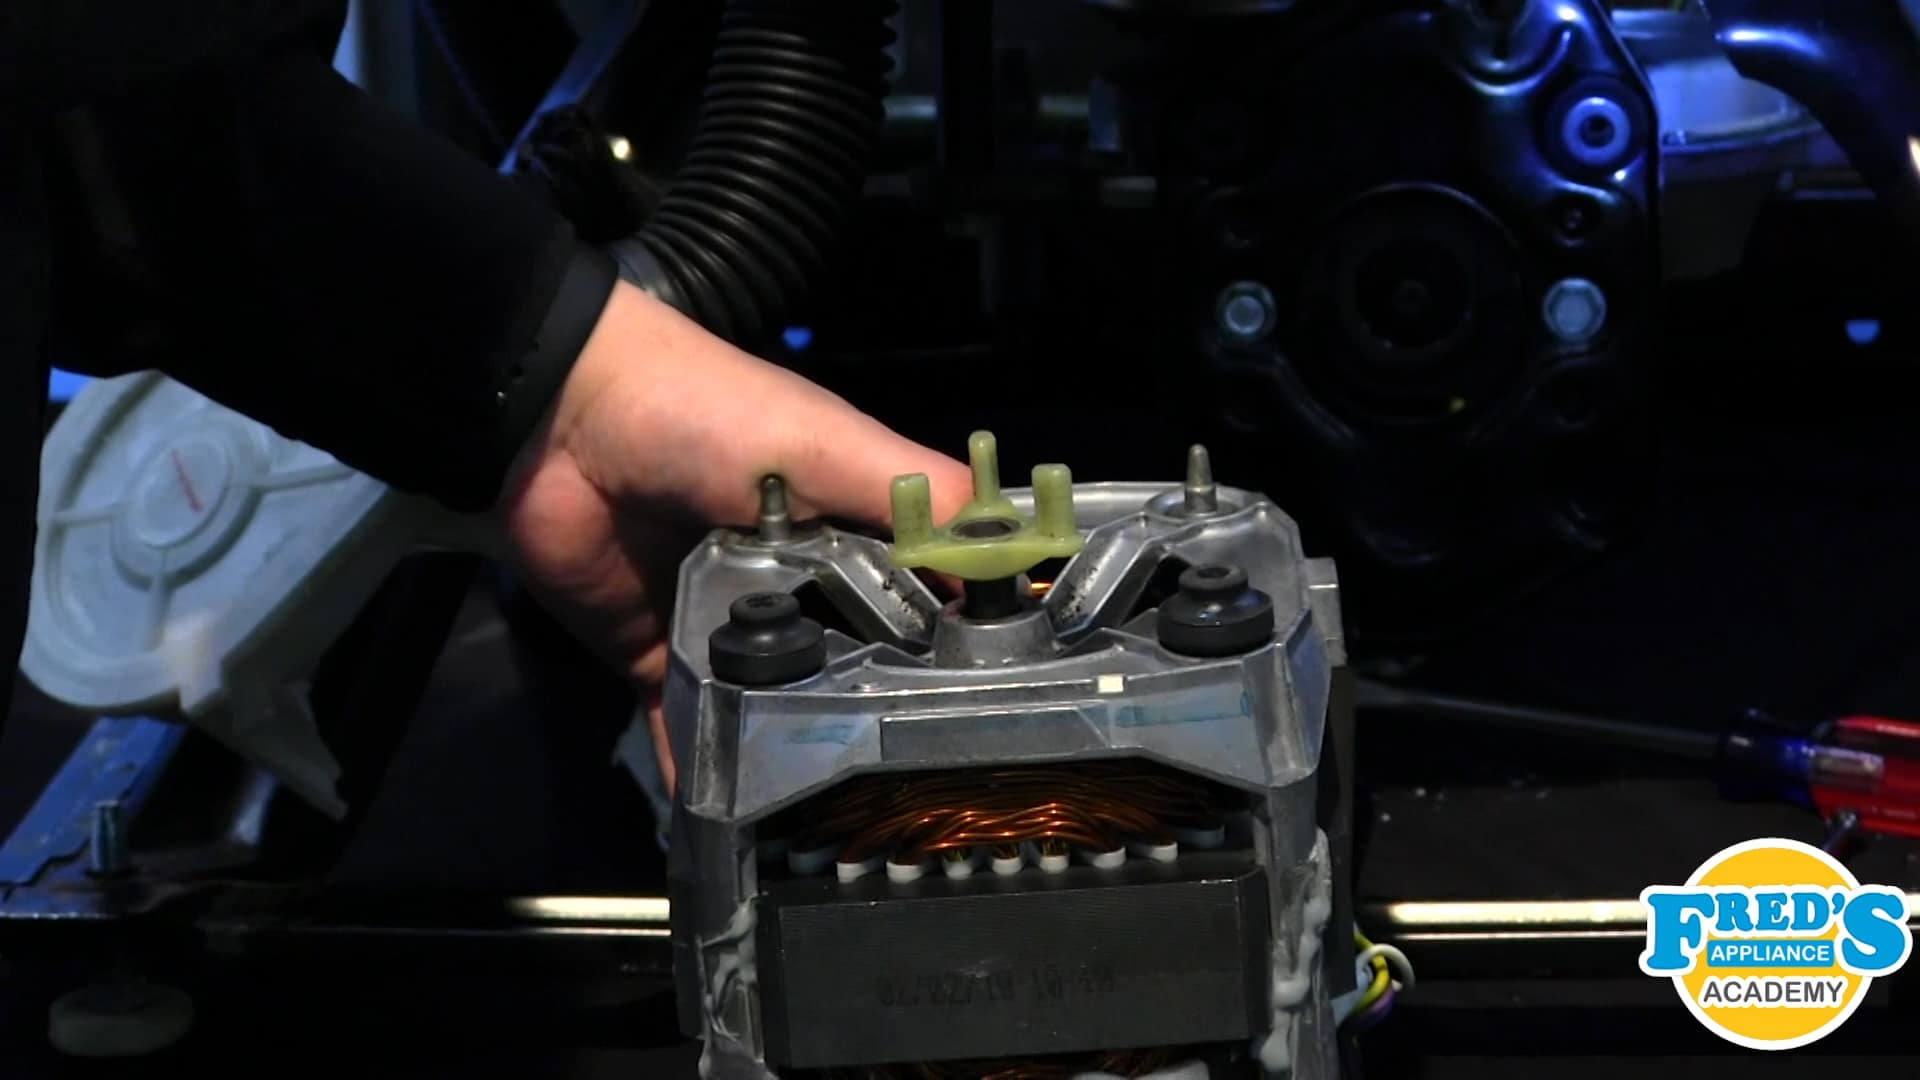
For taking the motor down. You’ll want to go ahead and use a screwdriver. So what we’re going to do is we’re going to pop the bottom bracket off. When you hear a little small click there and then we’re going to do the same thing for the top. Now you want to hold onto the motor so it doesn’t come down and damage the customer’s floor. So once that clamp is out, what we want to do is we want to take the motor and pull it out towards us and now we’re able to see the coupling area inside the transmission.
On the other side of the motor here, what we have is our coupling, which is made of nylon threaded rubber. These were one of the first generation styles, they make them out of all rubber now and then we also have the coupling portion here that connects to the nylon and these couplings, when they’re on there, what usually happens is they’ll crack. They’ve now since then went ahead and used reinforced steel in the middle there so that they have less cracking, but you’ll still find them out there where these motor couplings will be cracked in half.
What we’re going to actually have to do is remove the coupling from the transmission and sometimes this can be a little bit of a bear, a little bit of a different angle that you have to get into, but you might be lucky to find it cracked and not have to go through that. But if you need to, use some food grade silicone, you can go ahead and squirt that right inside to where the motor transmission shaft’s at and you’ll want to put a rag down on the customer’s floor and then you’re going to take a flat blade screwdriver and you’re just going to pry in different areas, making sure twisting the coupling each time that you pry evenly, that’ll just pop loose then, so that’s one portion of the coupling there.
We’re going to do the same thing for our motor, so we’ll flip the motor upside down here and again, we have moving blankets, a rug, something protecting the customer’s floor. We’re going to use that same motion and we’re going to pry up on our motor coupling here, twisting the coupling and getting it evenly and now this is going to come off.
Once we have that off there, what we’ll want to do is take some scotch brite pads or you could take a fine grit sandpaper and on the motor shaft you want to clean that off to make sure that there’s no debris on there that’s going to fight the new coupling going on, so I’m just going to clean that off inside there. Set the motor off to the side and then take a look inside where my transmission is at and make sure we’re not leaking any oil or anything like that and just seeing if this needs to be cleaned at all. It doesn’t hurt just to get inside there and clean that shaft off, but also to help you out to put the new coupling in, go ahead and spray that silicone. Just a little as all you need.
The first portion of the coupling, we’re going to line it back up on the transmission side here, and what I like to use is a nut driver, the end of it, it will not allow me to go too far with the coupling on the shaft. It’ll end up bottoming out on the back of the nut driver there so we’re just going to give it a couple little taps and that’s actually on right there.
We’re going to take our motor and we’re going to do the same thing for it. But so we are away from our motor windings and everything, I’m just going to go ahead and put a little silicone inside the coupling here. Line that up on your shaft, and again, use a nut driver and again floor protection is the biggest thing that we have here. So make sure you have floor protection down or you’re going to be putting an indent inside the customer’s floor.
All right, now that that’s on, we’re going to take our motor coupling insert there. We’re going to line our couplings up so they’ll match. So what we’ll have to do is fill the bottom and then the two upper voids right there with the coupling that’s on the motor. Make sure you’re reinstalling the motor correctly on the correct side so the wiring harness is on the right side and then just twist that motor shaft to be able to position that back in. Now that we have that back in there, we’ll go ahead and take our top strap, bend down just a little, twist that up into place. And once you have the top one on there, you can let go of the motor. We’re going to go ahead and pull the bottom one up. Reinstall our two quarter inch screws.
Reinstall our wiring harness, make sure that’s secured in place and then we’re going to go ahead and reinstall our drain pump. This might be the hardest part of this whole job is trying to line the drain pump back up to now where the coupling’s at. So you have to just give it a look and see where you might have to spin that motor shaft to be able to line it up with the drain pump, and there we go. Made it look easy for you and it never happens that way when you’re in the field. Snap that back into place and then a lower one here as well. All right and that’s it.
So what we do from here is we would actually want to go ahead and test the unit, make sure that we’re running it, fill it up, let it go through an agitation, let it go through a spin. When I have it out like this, I’m able to see everything, whether it’s going to leak water. If you did loosen up the hose connection here, you want to make sure that you’re putting those on there. You want to do everything that you can to prevent any flooding and while looking over the unit, any possible future service calls you want to just go ahead and take care of for the customer. If it’s a warranty call, take care of it. If you find something else makes you letting the customer know and estimate them for that replacement of whatever other part it might be.
When you get this back on, you would go ahead and put your casing back on and I go ahead and level the unit. These are self level in the legs, so you would actually pull the unit forward towards you and then just let it go down gently across the customer’s floor and the legs will self adjust.
So that’s replacing the motor coupling. We really like to put these really easy videos out there for you so the average Joe can go out and fix their unit. This trade, appliance repair, it’s one of the least recognized trades out there and someone’s always looking for some kind of good video or whatever it may be to help them repair their own appliance. Yes, we know that there’s a lot of money that you could put into a unit and you have to look at is it worth repairing or is it worth fixing?
Something like this model where it’s no longer being produced but it’s still out in the field and they still do make parts, you want to get the customer to replace the part in the unit because they are really not going to be used to how the newer units run with less water. The tub is suspended. The sounds that it makes, it’s really going to generate some unnecessary service calls. So if you go out and get it, try to sell that job. Some of these parts are real small. You could stock them in the truck, they don’t take up space. It’s the first call complete, and the customer enjoys that 100%.
So I hope you liked the video. Hit that like hit that subscribe button and keep an eye out for more videos to come here. This is our Whirlpool direct drive washer, motor coupling, and Tim Gleba with Fred’s Appliance Academy, training tomorrow’s technicians, today.
Join the industry's best trainers.

(800) 781-1814Text or ring! ring!
Live ChatClick to say hi

Apr. 05, 2024
How to test a gas range ignitor

Mar. 29, 2024
Congrats to our graduating March 2024 class

Mar. 22, 2024
How to test a 120 volt receptacle

Mar. 01, 2024
Congrats to our graduating February 2024 class

Feb. 05, 2024
Why Is Your Dishwasher Soap Not Dissolving? (5 Easy Fixes)

Feb. 05, 2024
Refrigerator Dripping Water Inside? 5 Quick Fixes

Feb. 02, 2024
Appliance Industry 2023 Q4 Results

Feb. 02, 2024
Congrats to our graduating January 2024 class
Jan. 26, 2024
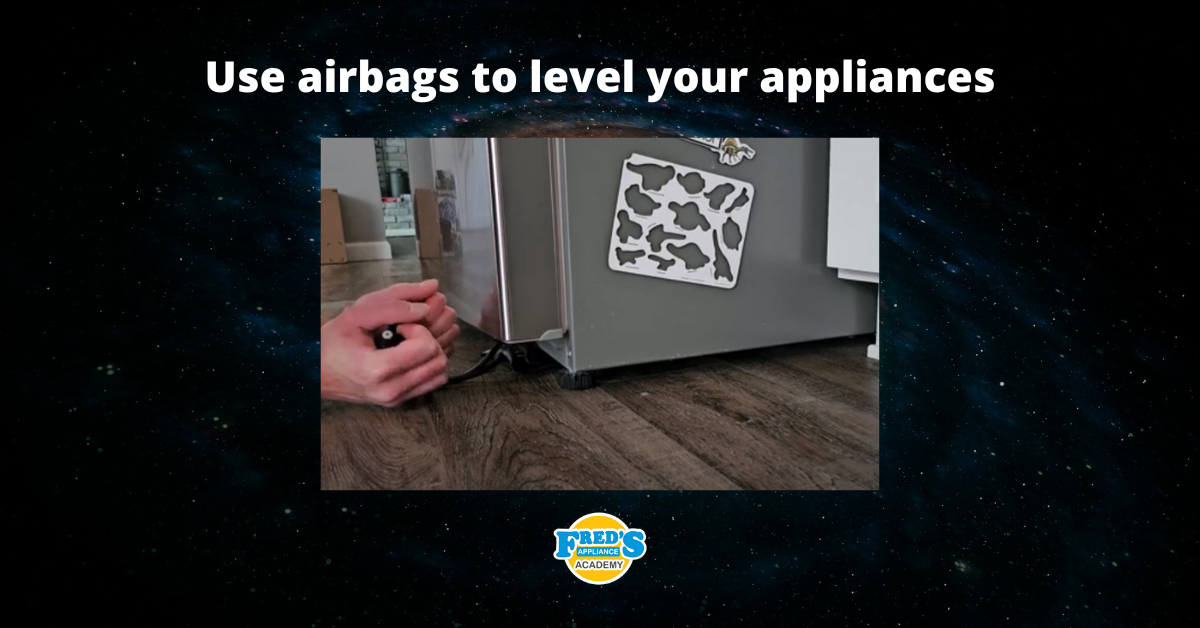
Clever ways to use airbags to level your appliances
Jan. 12, 2024