


Fred's Appliance Academy
November 14, 2019
Video
Tim: 00:15 Hey, guys, Tim with Fred’s Appliance Academy. In today’s video, we’re gonna show you how to hook up a power cord to your electric range that you just purchased. The electric cords for the ranges don’t come with your unit, so you’re gonna have to purchase and you’re gonna have to be able to identify which cord you need for your home.
Tim: 00:33 There is a difference between your dryer and your range cords from three to four prongs. So starting with the pronged cord, you’ll need a 40 AMP cord. Being able to identify that cord, you’re gonna have all flat prongs on the end of the cord. All right? Now, if you have good eyesight, you can right on the cord that it’s 40 AMP.
Tim: 00:55 With your 30 AMP dryer cord, you’re gonna notice that your neutral, which is your top prong here is L-shaped. So, if you have, uh, this type of cord for your range, it, in all general, it’s the wrong cord. You need to get the correct one.
Tim: 01:12 When you get to your four-prong, uh, cord, again, 40 AMPs, everything is flat. We just added a ground to the top. So, make sure that you don’t have the four-prong with the L-shape neutral on the bottom because they still added the ground on the top.
Tim: 01:31 So, make sure that, uh, you take a look at your outlet before going to the store, purchasin’ a new one, or before the installer gets there, uh, that they have both types of cords on their trucks.
Tim: 01:45 Not every house is set up the same. Older homes have the three prong rather than the four prong. All newer homes have the four prong. Um, so, we’re gonna get, uh, going here, and we’re gonna show you how to hook these us properly, both three and four prong.
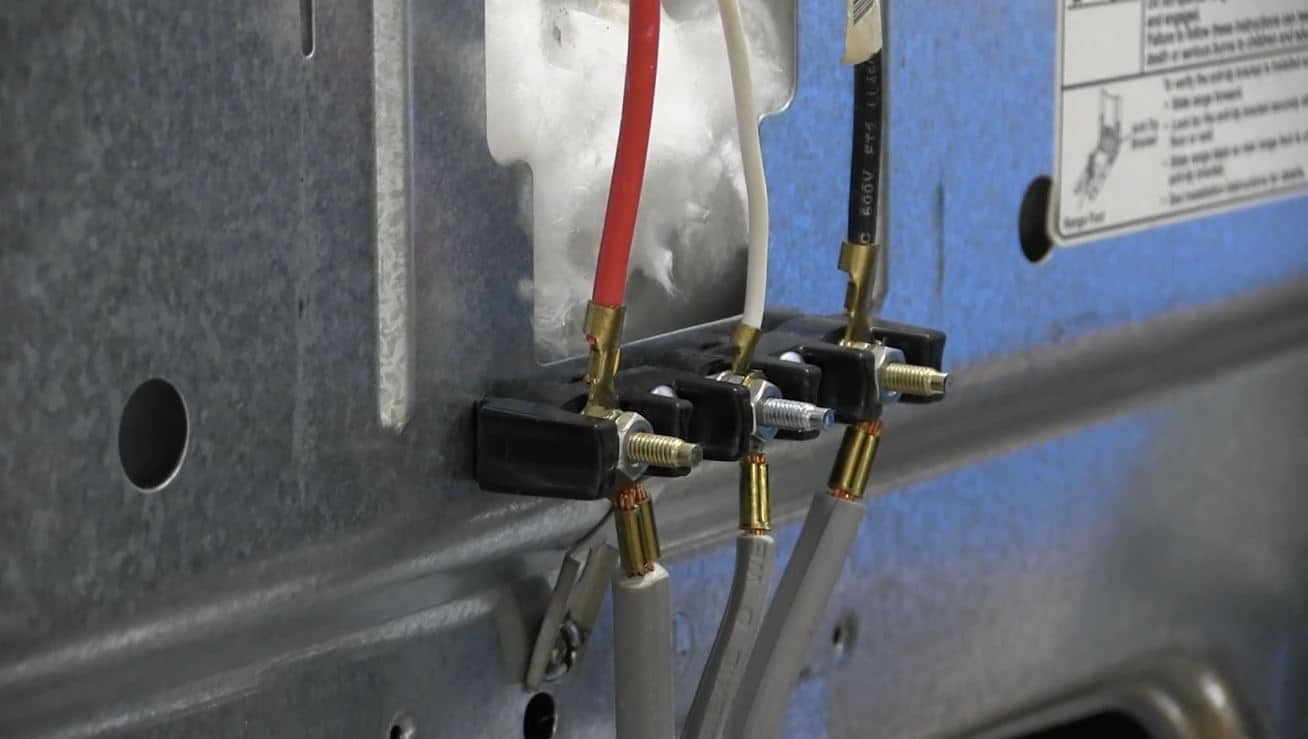
Tim: 02:01 All right, welcome back. Now, we’re at the back of our range here, and we ready to install our cord. All the terminal blocks will have a cover on them so they’re not exposed, because that becomes a hazard, and that’s safety. We wanna make sure that, uh, we’re doing things safe. Make sure the power’s off. Uh, if you can’t unplug the old unit, go ahead and turn the breaker off to the unit.
Tim: 02:22 Um, so what I’m gonna do is I’m gonna start here by removing the back cover to the terminal block. And it’s just two Phillip screws here on the bottom. And once I get these removed, I wanna make sure that I keep this with the panel. The panel, this type here, just slides right down. You’ll feel that pop there, and you can just go ahead and pull off, and you’ll see that we have our terminal block here.
Tim: 02:54 So, I’m gonna put my cover and my screws together here because I don’t wanna miss, lose my screws. And I’m gonna grab my three prong cord here. Now, as we see, we have nuts that are gonna hold on our cord. We’re gonna have to remove these three nuts that are in front of the wires. And doing so, make sure that you don’t drop one, it doesn’t end up down the air vent, uh, it doesn’t get out of your sight, because we can’t just use any nuts on this. These are specially threaded for this type of terminal block here.
Tim: 03:37 Um, we also wanna make sure right from the factory that the connections, which is your, uh, two other ones. Those are your line voltages and the middle one is your neutral. We have a ground strap on this, so that’s gotta be there as well for the three prong.
Tim: 03:53 From the factory, I’ve seen it before. We wanna make sure that this, these nuts behind here are tight. What’ll happen is if we end up with loose connections, we’re gonna end up with a burnt cord. Um, and I’ve got a de- I’ve got a little picture of a burnt cord here. Um, right here. This, however, is, um, a burnt cord from an electrical outlet, uh, hazard. This had a loose connection inside there. It started warming up, and it started melting.
Tim: 04:21 If we see any discoloration down here or any melting of the wire, it’s usually a loose connection down at the range. Now from the factory, these panels and the ways these wires are routed, uh, when we put, pull this wire up through here, we wanna make sure that we’re careful that we’re not pulling too hard on the sides, because these are very sharp. We don’t wanna strip that cord away. Uh, the insulator, that’s gonna protect it because then, we go to plug it in, we’ll end up with a short or it could become an electrical hazard from the customer itself.
Tim: 04:56 Now, the two outer, uh, lines of the cord, we can put those on the two outers there. That does not matter how those are hooked up, as those are inbound voltage lines. The one that does matter is the middle one, which will remain right in the middle there.
Tim: 05:13 We’ll take our nuts that we put off to the side here, and what I’m gonna do is hand thread these on first. And you don’t wanna use a power screwdriver. Um, or you don’t wanna use a drill for this because what you’ll end up doing is cross-threading this. And again, you can’t have a loose connection, uh, because if you end up having a loose connection, will make heat and will end up melting the cord.
Tim: 05:43 So, I’m just gonna go ahead take my socket wrench here, and I’m gonna tighten each one of these down. And we wanna make sure that they are nice and snug, but not over tightened. If we do end up trying to over tighten these, this terminal block here is plastic. We don’t wanna crack that.
Tim: 06:08 Okay. Those are nice and tight inside there now. Now, we’re not done yet though. We have everything hooked up. We now need to install what’s called a strain relief. A strain relief comes with each cord, uh, when you purchase the cords. It’ll come in a little, uh, wrapping, uh. So, don’t discard that. Make sure that you have the strain relief. It’s gonna go up in here.
Tim: 06:30 And what this does is it prevents the cord from when you’re pulling the unit out from the cavity that it’s in, it doesn’t pull on the actual portions of the cord where we can cause, uh, them to bend, we can cause it to pull from the actual connectors, and we end up short into the, uh, cabinet. We’ll get sparks, uh, or we can energize the cabinets.
Tim: 06:51 We wanna make sure that we’re installing the strain relief on these. Uh, some of these are not so easy to install. Um, some of ’em can be a little bit of a pain. This, however, they give us a bunch of room here. So, I’m gonna go ahead and install that. That just flips up just like so, and you have two Phillips screws that you’re gonna go ahead and install. I’m gonna kneel down here so I have a better view.
Tim: 07:28 And I’m gonna start one. Now, that I have the one started, I’m gonna start the other. And you just wanna go and tighten one by one. Get one side tight a little, then go to the next one. Get the other side tight a little, go to the next one. Um, making sure that we’re doing this even all around, uh, make sure that we’re not pinching on the wires, um, on the outside, that we’re not cutting into the wires. But, these should be nice and tight on the unit itself so if we do go to pull this unit out, we’re not gonna be pulling on to connectors right here. We’d be pulling from the cord.
Tim: 08:13 So, we have our strain relief, uh, hooked up, we’ve got our wires nice and tight. We’re just gonna go ahead, reinstall our cap- uh, back panel here that was put off to the side. And again, the pow- power’s still off to the unit. We haven’t plugged it in yet. I wanna make sure this is all installed first before we power the unit up.
Tim: 08:46 Now once again, as you see, no power tools on this. The sheet metal’s very thin. I don’t wanna strip out any of these screws. Um, that’ll become a hazard in the future here where the screws might pop out, and we can end up short in to this cover here.
Tim: 09:07 All right. Now that we have installed, we can go ahead, plug the unit in, test out each function, make sure everything’s working properly, show the customer everything’s working properly, and give further instruction, uh, from there to how they wanna use the range, um, what they wanna avoid doing, and what they wanna, uh, do to get the best results out of their cooking, uh, with their new range here. And we’re gonna get to, now, the four prong installation.
Tim: 09:40 All right, welcome back. Now, we showed you how to do the three prong install, now we’re gonna show you how to do the four prong install. As you can see, we have a white, black, red, and green. We’re gonna match ’em up. Uh, we don’t see a green though here. Where we do see a green is this ground strap, and this is gonna be one of the most important things, uh, that you’re gonna do.
Tim: 10:00 If we forget to do this and we attach the ground right here and forget to pull this ground strap up and connect it with the neutral, what we could end up having is a customer complaint of when they rub up against the range or they touch the range, they may get some kind of shock or sensation, um, when they touch it.
Tim: 10:17 Um, what that is is that’s feedback, uh, voltage going back through. So, our inbound all voltages, which is your L1 and L2, where your neutral is your return line. So, we can accidentally energize the cabinet, which we don’t wanna do. We add the ground for safety, which will go ahead and prevent, um, any kind of shock hazard to the customer if anything should accidentally come energy within the cabinet, it’s gonna trip the breaker.
Tim: 10:46 So before I go install the cord, what I’m gonna wanna do is go ahead remove that ground screw there, and I’m gonna want to join this strap with the neutral. Now, it doesn’t require anything but your hands. You’re gonna go ahead and gently lift up, and we’re gonna feed that right onto our neutral line there.
Tim: 11:14 Now, we can go ahead and install our cord. So, we’re gonna feed up the cord, same thing with the three prong, we wanna make sure that we’re not pulling up against the edges of this because it’s very sharp and we don’t wanna, uh, ruin our insulators or have any bare spots.
Tim: 11:34 So what I’m gonna do now is I’m gonna connect my wires color to color. So, my red goes to my red, my white’s my white, black to black, and then green’s gonna come down here. So the first thing I’m gonna do is go ahead, reinstall this green ground screw with our green ground wire from the cord. Straighten that out a little, and we’re gonna tighten this down.
Tim: 12:13 Again, over tightening, we can end up causing the screws to strip out because, again, the sheet metal is, uh, very, uh, thin and we’re not using any power screw guns or drills on this. This is all hand tools. That’s your best bet to do this so we’re not stripping out the screws.
Tim: 12:32 You’re gonna go ahead, reinstall our three nuts here against this. Again, hand threading them on first. We have our ground strap on there so that white neutral wire is now against that original ground strap connected with our neutral.
Tim: 12:57 Okay. We’ve got those hand tight. We use our socket wrench for the rest of the way here. Again, not over-tightening, but making sure that they’re nice and snug, because it is a plastic terminal block. We don’t wanna take the risk of cracking the terminal block.
Tim: 13:31 Okay. As, uh, three-prong, same thing. We’re not done yet. We have to put our strain relief on there because, again now, we don’t wanna pull against these wires. So, we’re gonna go ahead and grab our strain relief. It’s gonna go on the same way that the other one did. And what we don’t wanna do is we don’t wanna go up against the actual wires of the cord. We wanna go against the cord body itself.
Tim: 13:56 So once we have the strain relief in position, we’re gonna push up a little on the cord here. And because of the bigger diameter, this may be a little more difficult to work with, um, but once you get it pretty much set, it’s pretty easy to go in from there. So, we’re gonna go ahead, add our screws here. I got that one started. The cord fell one me a little, which is okay. We can reposition that because we have not fully tightened them down yet.
Tim: 14:43 Okay. And again, it’s just gonna be little by little on each side. And main objective is to get this tight so we’re not pulling on the wires of the cord. Okay. Now that we have our strain relief on there, if you go to pull the unit out, we’re not gonna be pulling on these wires here. It’s actually gonna be the whole base of the cord right here.
Tim: 15:38 Um, so you wanna avoid making sure that you’re not pulling the unit all the way out and getting stuck and keep on pulling. For some reason the unit doesn’t come out all the way, you wanna make sure that you might not be caught on the floor, you wanna be, make sure that the cord isn’t just too short, um, but just don’t keep pulling. Uh, take a look behind the unit.
Tim: 16:00 And again, if you can’t safely grab the plug, uh, to unplug the unit to do service on the unit, make sure you’re turning the power off at the breaker. Now that we’ve got that all done here with our, um, strain relief back on, we’re gonna go ahead, take our back cover. Once again, same process as the three prong cord. Make sure that’s installed properly.
Tim: 16:26 And again, we don’t have this plugged in yet, the power turned on, uh, because we wanna make sure that we don’t short something out by placing this cover on there, because there are exposed wires. Um, not just for the terminal block, but the bake element is also there.
Tim: 16:49 Again, no power tools. All hand tools here. All right. We have our cover back on. At this time, what we do’s is we go ahead, plug the unit back in, and we would make sure everything works, and, again, go through all the functions with the customer and make sure that they don’t have any questions talking about how the preheat works and how they should be doing it, ’cause it’s very, very different from their older units.
Tim: 17:18 Um, they, you know, they’re gonna have a lot of different questions and try to answer those while you’re doing your install. That avoids unnecessary service calls in the field. Uh, I hope you guys enjoyed the video here. I hope it was helpful. Uh, if so, please like and share this video, subscribe to our channel, and, uh, keep an eye out for more of, uh, how-to videos, and looks inside our academy.
Tim: 17:40 Again, this is Tim with Fred’s Appliance Academy. I thank you guys for joining us today.
Join the industry's best trainers.

(800) 781-1814Text or ring! ring!
Live ChatClick to say hi

Apr. 05, 2024
How to test a gas range ignitor

Mar. 29, 2024
Congrats to our graduating March 2024 class

Mar. 22, 2024
How to test a 120 volt receptacle

Mar. 01, 2024
Congrats to our graduating February 2024 class

Feb. 05, 2024
Why Is Your Dishwasher Soap Not Dissolving? (5 Easy Fixes)

Feb. 05, 2024
Refrigerator Dripping Water Inside? 5 Quick Fixes

Feb. 02, 2024
Appliance Industry 2023 Q4 Results

Feb. 02, 2024
Congrats to our graduating January 2024 class
Jan. 26, 2024
Clever ways to use airbags to level your appliances
Jan. 12, 2024