


Fred's Appliance Academy
April 5, 2021
Microwave Training
LG microwaves come with a range of different features to help you cook your favorite dishes. However, like all microwaves, over time parts can deteriorate or become dislodged, which can cause abnormal microwave noise. The type of noise, location it is coming from, and whether the heat is affected will help to diagnose the issue. If your LG microwave has started making loud or unusual noises, read on to fix the problem.
Most repairs will require Phillips-head and Torx screwdrivers. Leather gloves will also protect your hands if removing the microwave’s casing.
This guide applies to the following LG models:
LMH2016SB
LMH2016SW
LMHM2017SB
LMHM2017ST
LMV1630ST
LMV1680BB
LMV1680ST
LMV1680WW
LMV1683SB
LMV1683ST
LMV1683SW
LMV2073BB
LMV2073ST
LMVM2055ST
LRDM1240B
LSMH207ST
MA1005W
MV1401B
MV1401W
MV1610ST
MV1610WW
Important: Repairing a microwave can be extremely dangerous.
The high-voltage capacitor inside the microwave can store a lethal amount of electricity. Lethal amounts of electricity can remain in the capacitor for an indefinite period. Before accessing electrical components in the microwave, the capacitor must be discharged.
Due to the risk of electrocution, it is recommended that a trained professional be used to repair microwave electrical issues.
Turntable
The first thing to check is the turntable. A thumping or rattling noise is often caused by the turntable plate not being placed in the microwave correctly or because of defective rollers.
- Check that the turntable plate and roller support are installed correctly.
- Check the rollers for wear and tear and debris.
- Make sure you are not overloading the turntable plate.
- If your microwave has just been installed, check that the tape over the shaft at the bottom has been removed to prevent a squeaky noise.
If the turntable support or turntable plate is damaged, replace it with a new one.
Turntable Motor Coupler
The turntable motor coupler can also deteriorate or become dislodged. The coupler attaches to the turntable motor from inside your microwave (on most models), helping to turn the microwave plate. On other models, you should be able to access the coupler by removing the turntable motor cover beneath the microwave.
- Check the condition of the motor coupler.
- Replace the coupler if damaged.
Turntable Motor
A grinding sound coming from underneath the microwave indicates the turntable motor is at fault. A noisy microwave that is still heating also indicates a problem with the turntable motor (also the stirrer motor).
You should be able to access the turntable motor by removing the access cover underneath the microwave. If you cannot access it underneath, you will need to remove the microwave casing. Be careful not to lose any screws when unscrewing panels from the microwave.
- Disconnect the microwave from the power.
- Remove the turntable plate, tray, and support roller from inside the microwave.
- Turn the microwave on its side to access the turntable motor cover panel.
- Remove the panel to access the turntable motor.
- Inspect the turntable motor for damage.
- Test the turntable motor for continuity.
- If defective, replace the turntable motor.
Cooling Fan
In some cases, the cooling fan inside the microwave may have become dislodged, or debris may be caught in it. This could be causing the fan to clip against another part of the microwave or be causing a rattling sound.
Depending on the model, accessing the fan may require the removal of other components from the microwave. Taking photos before removing these parts will help ensure you remember how to reassemble the microwave. You should always exercise caution when removing parts from the microwave.
- Disconnect the microwave from the power.
- Discharge the capacitor.
- Remove components obstructing access to the fan.
- Examine the fan to see if it is spinning freely.
Cooling Fan Motor
If the fan is not spinning freely, the fan motor will likely need to be replaced.
- Make sure the microwave is disconnected from the power source.
- Examine the cooling fan.
- Test the cooling fan motor for continuity with a multimeter.
- If defective, replace the fan motor.
Magnetron
The magnetron produces microwave frequencies that cook the food. The typical hum a microwave makes when cooking is produced by the magnetron. A problem with the magnetron will increase that sound. In some cases, it may also emit a high-pitched noise.
Running the microwave on a low power setting, to see if the noise is quieter, will indicate whether the magnetron (or diode) is to blame. Noise at regular intervals while the microwave cooks also indicates a problem with the magnetron. Another indication is if the microwave is noisy and not heating food. Make sure to exercise caution when accessing the magnetron.
- Disconnect the microwave from the power.
- Remove the top microwave cover to access the magnetron.
- Discharge the capacitor.
- Test the magnetron for continuity.
- If defective, remove and replace the magnetron.
Diode
In some cases, the diode, not the magnetron, can cause microwave noise. Therefore, it pays to check the diode before replacing the magnetron.
- Make sure the microwave is disconnected from the power.
- Make sure the capacitor has been discharged.
- Test the diode for continuity.
- If the diode is defective, replace it.
Stirrer Motor
The stirrer motor powers a metal blade that deflects microwave energy throughout the microwave. If the microwave is noisy but is still heating food, the stirrer motor may be responsible. A grinding noise also indicates a worn-out stirrer motor.
- Disconnect the microwave from the power.
- Access the stirrer motor from inside the microwave cavity, above the turntable plate.
- Remove the stirrer motor cover.
- Inspect the stirrer motor. If the blade has become loose or is damaged, it will need to be replaced.
- The stirrer motor can also be tested for proper voltage with a multimeter.
- Replace the stirrer motor cover when done.
If you have followed this guide but the microwave is still making an unusual noise, contact LG for further guidance.
Join the industry's best trainers.

(800) 781-1814Text or ring! ring!
Live ChatClick to say hi

Apr. 05, 2024
How to test a gas range ignitor

Mar. 29, 2024
Congrats to our graduating March 2024 class

Mar. 22, 2024
How to test a 120 volt receptacle

Mar. 01, 2024
Congrats to our graduating February 2024 class

Feb. 05, 2024
Why Is Your Dishwasher Soap Not Dissolving? (5 Easy Fixes)

Feb. 05, 2024
Refrigerator Dripping Water Inside? 5 Quick Fixes

Feb. 02, 2024
Appliance Industry 2023 Q4 Results

Feb. 02, 2024
Congrats to our graduating January 2024 class
Jan. 26, 2024
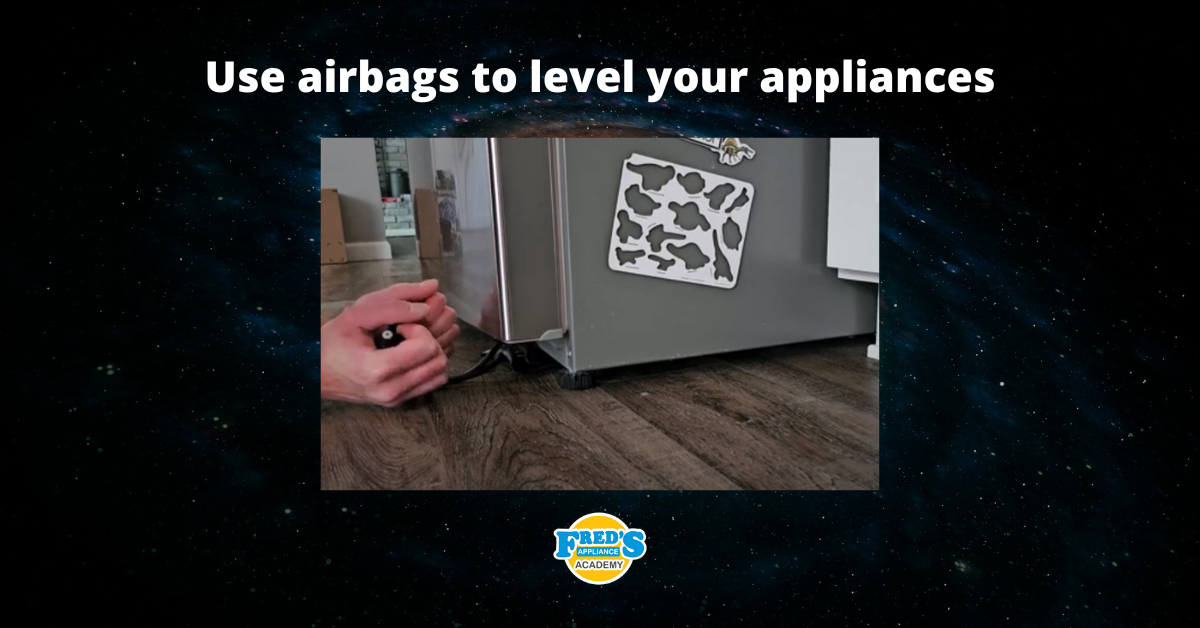
Clever ways to use airbags to level your appliances
Jan. 12, 2024